Build a workflow
A workflow is a job you do by hand, written down once so Kitewell can do it for you: collect the invoices, enter them, email a summary. You build it one piece at a time, try each piece on its own, then run the whole thing and watch it work.
Each piece is a step. A step does one thing — run a command, fill in a website, read a mailbox, ask a person — and the next step waits for it. The editor draws the steps as a map, so you can see the order at a glance.
What you need
Section titled “What you need”A project to keep the workflow in, which you have already if Workflows is in the sidebar. Beyond that it depends on the steps you choose:
- A command, a website step, or a wait needs nothing else.
- An AI step needs a model or an agent set up under Agents & models.
- An email step needs a mailbox connected under More → Mail accounts.
- A password or key a step needs is stored first under More → Secrets — a secret, so the value never shows in a log.
A step that cannot find what it needs says so before you run, so you can start building without setting all of this up first.
Build it, one step at a time
Section titled “Build it, one step at a time”- Choose Create a workflow and give it a name. The editor opens on Build with nothing in it and asks What would you like to automate?
- Choose a task. The steps you add appear on the left under Workflow map; the one you are working on opens on the right under Step details. That screen calls them tasks; once one is on the map, it is a step.
- Type a name in Step name — plain words, such as
Collect new invoices. This is the name you will look for in a log later. - Fill in what the task needs. A command step has one field, Command; a website step takes the address and what to do there.
- Choose Add step, or the + below a step on the map, for the next one.
When should it run? decides where it goes:
- Continue the flow after this step, so the steps that came after now wait for the new one;
- Add a branch after this step, for another path alongside the first;
- Start independently, for work that waits for nothing.
- Carry on until the job is written down. Duplicate, Move up, Move down and Remove step tidy the order afterwards.
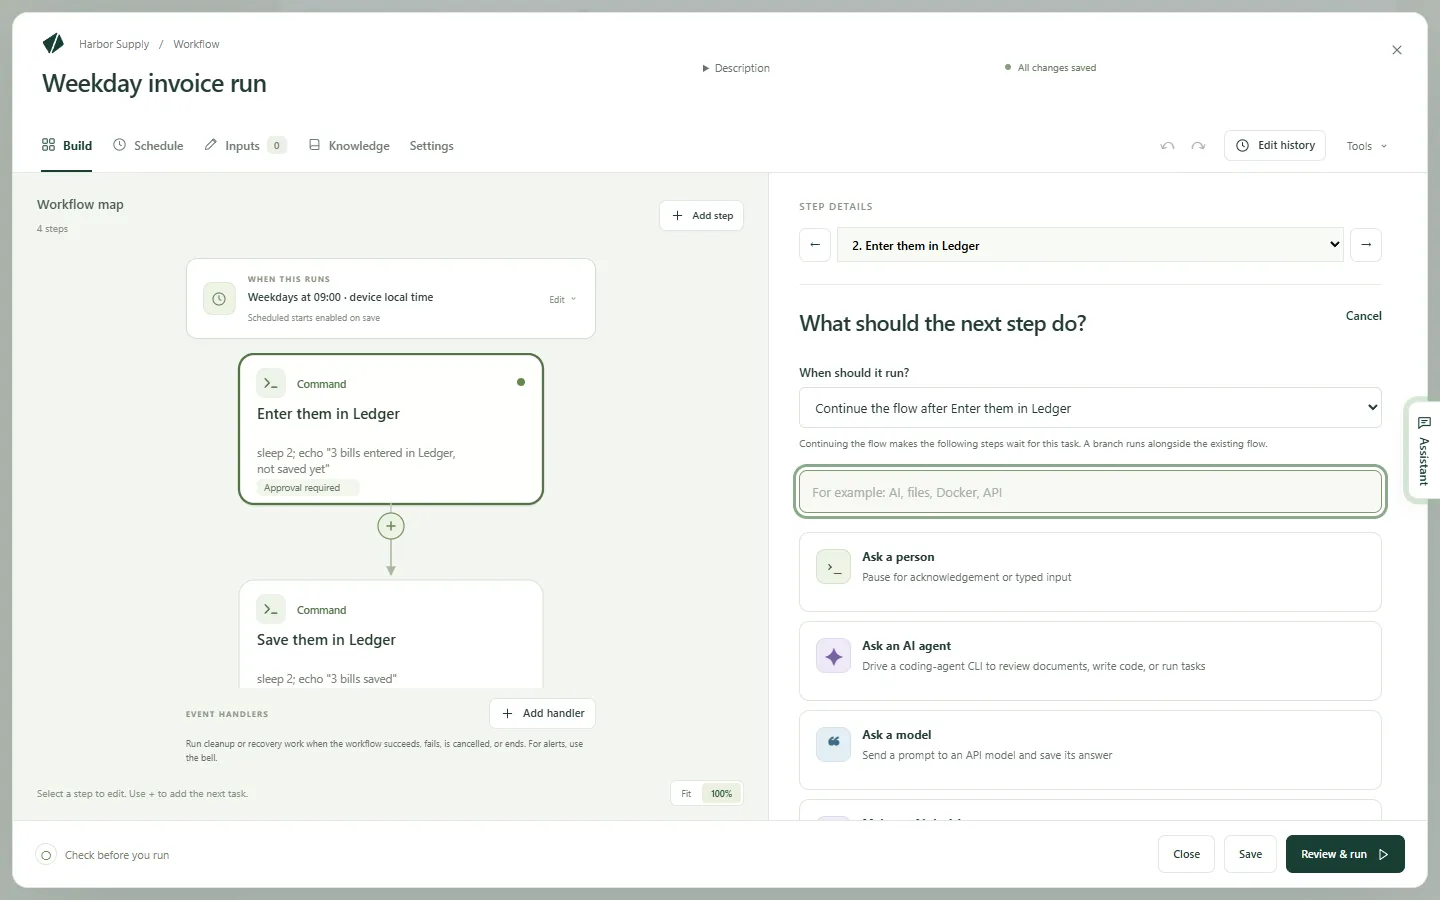
Two shortcuts save typing on an empty workflow: describe the job under Describe what this workflow should do and choose Ask the assistant, or pick a card under Or start from an example. Tools → Browse examples opens the examples again later.
The tasks you can choose
Section titled “The tasks you can choose”Find a task searches the list, so you can type email or Excel instead
of hunting. These are the ones most people start with:
- Run a command or script: run something on this computer.
- Automate a website: open a site and click, type, read, or download, described in plain language. See Automate a website.
- Automate a desktop app: use an app on this computer the way a person does. See Automate a desktop app.
- Send email, Find emails, Organize emails: write, read, and tidy a connected mailbox. See Automate email.
- Ask a model: send a question to a model and keep its answer.
- Ask an AI agent: hand work to a coding agent installed on this computer.
- Make an AI decision: sort something, score it, or answer yes or no, in a form the next step can read.
- Ask a person: stop and wait for someone to confirm or type something in.
- Wait: pause for a length of time, until a moment, or until a file is there.
- Repeat until: check something every so often until it is ready, up to a number of attempts.
- For each item: run steps once for every item in a list, and collect the results.
- Branch by value: send the work down one path or another.
- Fill in a text template: build a message or a file from a template and some values.
- Run another workflow: reuse a workflow you have already as one step.
The more technical tasks are in the same list, further down: Run in Docker, Call a web service, Use an API action, Run on another machine, and Copy files to or from a machine. Excel tasks are grouped under the Spreadsheets heading at the end — see Automate Excel.
Test one step before you run everything
Section titled “Test one step before you run everything”You do not have to run the whole workflow to find out whether one step works.
- Select the step in the map.
- Choose Test — ⌘↩ on a Mac, Ctrl+Enter on Windows.
- Watch the bar beside Test: it says what the step is doing, then how it ended. Choose See result to read what came back — Output holds what the step printed, Errors (stderr) anything it complained about.
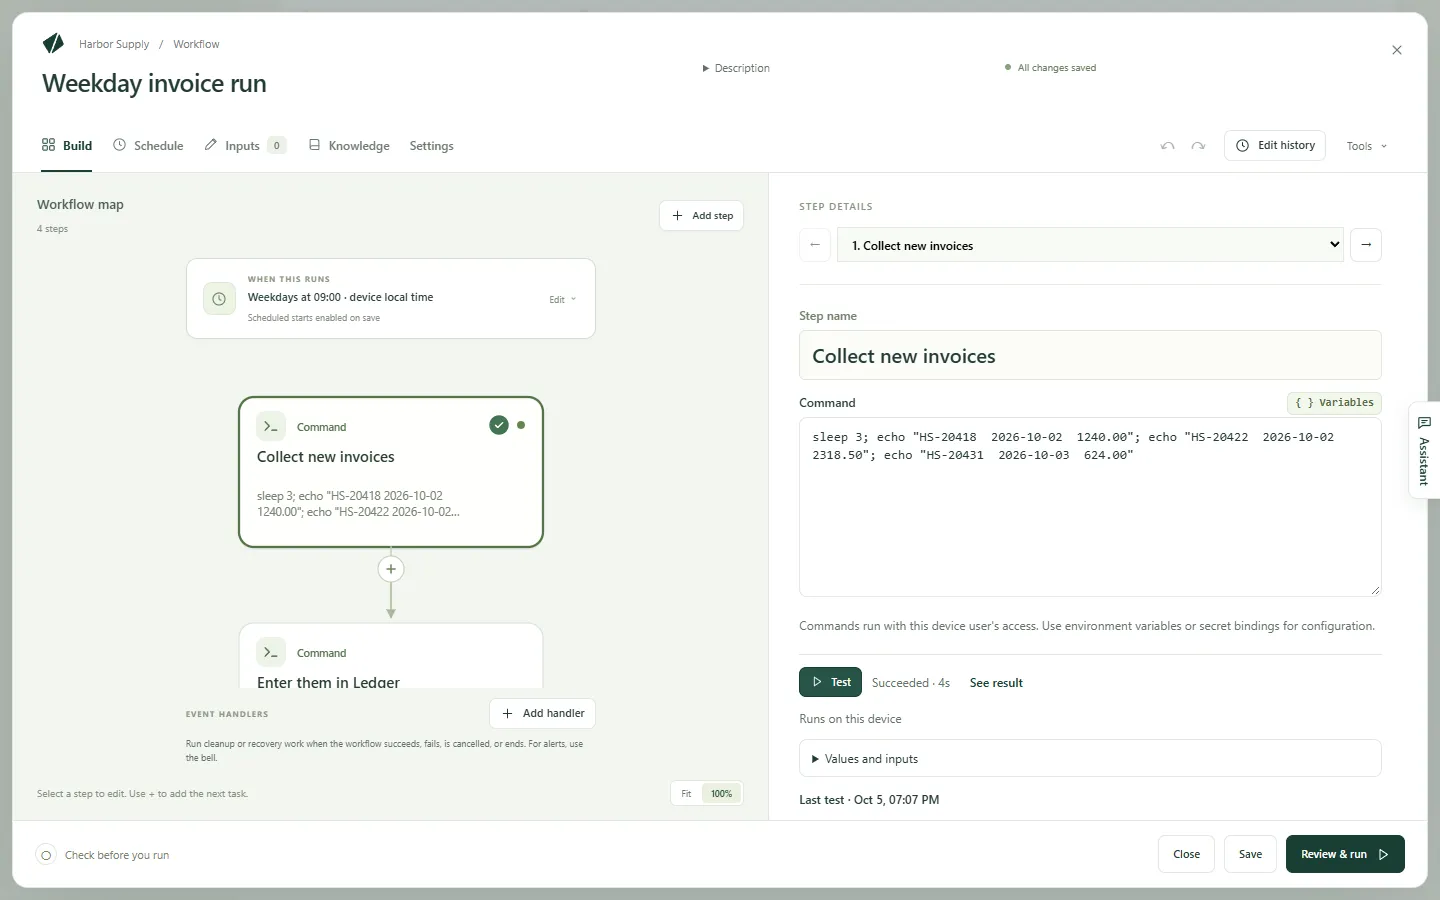
The test runs that step and nothing else, with your unsaved changes, and it does not save the workflow. Earlier steps do not run: their values come from their own latest test that passed, or you type them in. Values and inputs lists what the step reads and marks anything still missing.
A test is real work. Kitewell says what it will do before it starts — “Sends a real email from [email protected]”, “Runs on this device” — so read that line first, and choose Test anyway only when you mean it.
Four kinds of step cannot be tested alone yet, and say so instead of running: Ask a person, steps inside a For each item loop, event handlers, and steps aimed at a group of servers.
What can change each time
Section titled “What can change each time”When the job needs a date, a folder, or a title that differs from run to run, put it in Inputs rather than in the step. Each input becomes a field on the form you fill in when you start a run.
To use one, type ${ in a step’s field and choose the input from the list.
The same list offers secrets and results saved by earlier steps, and Kitewell
makes the step that uses a result wait for the step that produces it.
Check it, then run it
Section titled “Check it, then run it”Save keeps your work. Use it whenever you want to stop for now; the workflow’s schedule starts applying as soon as you save.
Review & run is the last look before real work happens. It gathers the name, how many Steps and Run inputs the workflow has, and its Schedule, and lists anything worth fixing first under Before you run. Check workflow checks the draft for mistakes.
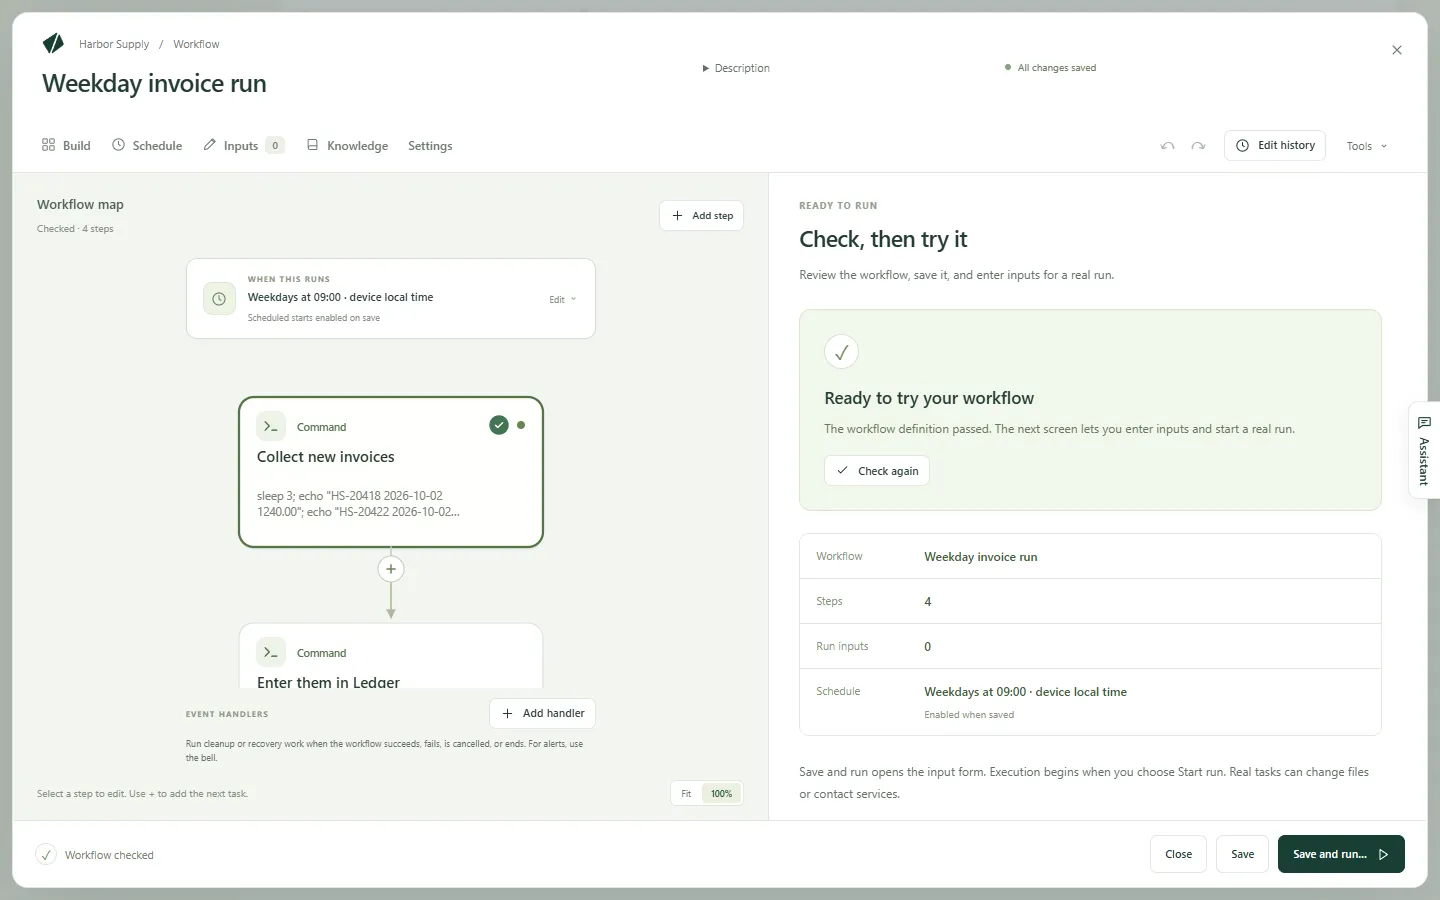
Then:
- Choose Save and run…. The workflow is saved and the run form opens.
- Fill in the fields under Parameters, if this workflow has any. A field that already has a value is locked until you tick the box offering to override its default.
- Choose Start run.
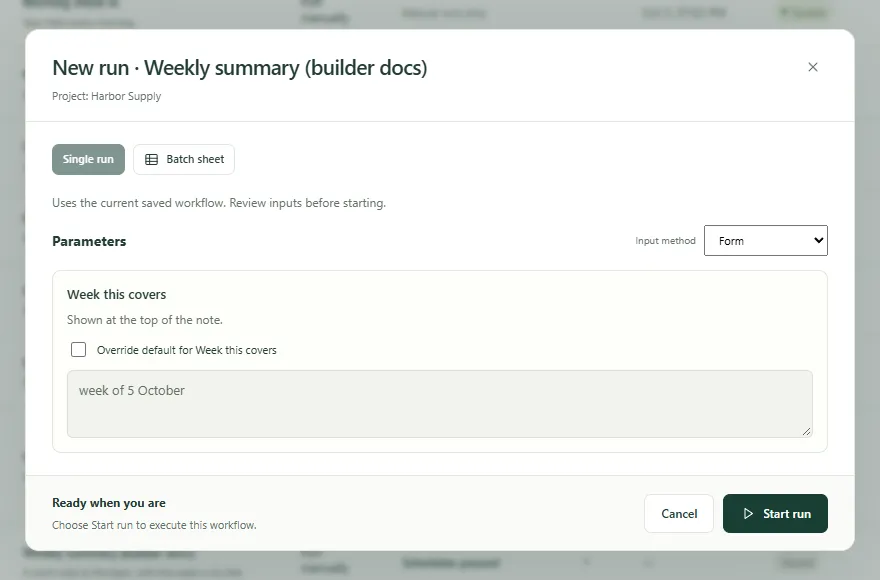
The run opens as it goes, step by step. A run uses the workflow as it was when it started, so editing afterwards does not change a run already going. See Runs and logs for what to do with the result, and Schedules to have Kitewell start it for you.
Stop and ask a person
Section titled “Stop and ask a person”Some work should not finish without somebody looking at it.
Ask a person is a step of its own. Write the instructions, and add a form when you need an answer — a choice, a comment, a number. The run waits until someone completes it.
To have someone check what an automatic step did, open that step’s Approval section and turn on Pause for approval after this step runs. Enter the question and any values to collect. Sending back re-runs chooses the step to repeat if the reviewer asks for changes.
An approval pauses after its step has run. To require permission before something happens, put an Ask a person step in front of it.
A person’s task can hand work back as well: under Send back for changes, turn on Let the reviewer send the work back and choose Send the work back to, a step that runs before this one. AI steps and model prompts that run again are given the feedback; a command reads each value as a variable, empty on the first run.
Waiting runs are under Runs & logs → Waiting, in Waiting for you. A person’s task offers Complete task, and Send back… when it allows it. An approval offers Approve, Send back, or Reject run. Sending back repeats the chosen step and the work after it; rejecting ends the run.
Run a task when the workflow ends
Section titled “Run a task when the workflow ends”Event handlers run beside the workflow’s steps rather than in the flow: before the first step, while the run waits for a person, on success, on failure, on cancel, or always at the end. Use one to delete a temporary file, undo a change, or call a recovery service.
Under the map, Event handlers lists the ones this workflow has. Choose Add handler and pick when it runs — Before steps, On approval wait, On success, On failure, On cancel, or Always at the end. The handler opens on its own; Task type changes what it does, and Back to workflow returns to the map. Ask a person, Make an AI decision, Branch by value, For each item, Wait and Repeat until cannot be handlers.
A handler can read the workflow’s inputs and variables and the run’s status, but not the results of its steps. In Runs & logs, a run lists its handlers beside its steps.
To tell people a workflow failed, use alerts rather than a handler.
Ask an AI agent or a model
Section titled “Ask an AI agent or a model”Set up a named agent or model under Agents & models first, then add it to the workflow:
- Ask an AI agent runs a command-line agent installed on this computer. Select the agent, write its prompt, and use Agent settings and context to set its project folder and any context.
- Ask a model sends a prompt to a model you have configured. Select the model and describe the answer you need.
Save the answer as a variable when a later step needs it.
Tools → Review AI prompts shows the instructions each AI step will receive, before anything runs. Values are filled in at run time. See AI agents and models for keys, permissions, and what each provider needs.
Use an imported API
Section titled “Use an imported API”Import an OpenAPI description into the API library, then add Use an API action to the workflow. Choose the API and the operation. Kitewell builds the request fields from the description, required parameters and request body included.
In a later step, open Variables and choose a field from the API step’s answer. Kitewell saves the value and makes the request finish before its result is used.
Run a Docker image
Section titled “Run a Docker image”Start Docker on this computer. In the task list, choose Run in Docker.
- Choose an Image, including its tag. Search the suggestions or use Browse images. Inspect reads the image’s ports, folder, and variables to help you fill the step in.
- Enter the command to run inside it. Use Shell script for several lines,
pipes, or shell variables; that image must contain
/bin/sh. - Expand the options you need: working folder, mounts, environment, published ports, network. A file created inside a container needs a mount to survive outside it.
- Check Docker checks the connection. Test runs the image and command for real, so look over its mounts and effects first.
Kitewell does not install or start Docker. Containers are removed after a run unless Keep container after run is on. Mounted files and Docker volumes need backups of their own.
Run commands on another machine
Section titled “Run commands on another machine”Open More → Servers. Add each server’s address, username, and how to sign in. Keep passwords in Secrets, or use a local private key with no passphrase. Under Host key checking, keep the default and approve the fingerprint through Test connection, use This device’s known hosts, or choose Do not check. A Jump host reaches a server that sits behind another machine.
A group gives several servers one name. Put them in the order you want, choose how many may run at once, and choose whether a failure stops the rollout or lets it carry on.
In the workflow, add Run on another machine. Pick the server or the group in Where it runs, then enter the command. A group makes a separate step for each machine, so each result appears on its own in Runs & logs.
To send every command and script step to the same place, use the workflow’s Settings → Where it runs. A group here runs the whole workflow on each machine in turn, as a separate run per machine. Docker, AI, web service, imported API, and sub-workflow steps still run on the computer running Kitewell.
If something goes wrong
Section titled “If something goes wrong”- A step fails the moment it starts. Usually a missing program, the wrong folder, or a secret with no value on this computer. Test the step on its own and read Errors (stderr).
- A step reads an empty value. The step that produces it has to run first. Open Available values on the step that reads it, check the value is listed, then check Run after.
- The editor will not let you change a field. Some advanced settings live only in the workflow’s text. The message says so, and Tools → Edit YAML opens it.
- A command works in Terminal but not here. A step runs with the permissions of whoever is running Kitewell, from the workflow’s folder, and without your own shell setup. Give the program its full path.
More in Troubleshooting.
Details
Section titled “Details”- Tools holds Visual editor and Edit YAML, two views of the same workflow; Browse examples; Review AI prompts; Check workflow; and Refresh editor suggestions, which reloads what the text editor offers as you type.
- Tools → Edit YAML opens the workflow as text, under the label Workflow YAML. Everything the visual editor does is written there, along with a few things only text can say: a one-off schedule, an unusual executor, a comment. Ctrl+Space offers suggestions and Tab indents. Comments, and settings the visual editor does not show, survive the trip back.
- A step that prints something can keep it as a file: fill in
Artifact name (optional) and the file appears among the run’s
Artifacts. A step can also write files into
$DAG_RUN_ARTIFACTS_DIR. - A workflow keeps its last 50 step tests, and one test runs at a time. The values a test offers come from the latest test that passed.
- Shortcuts: ⌘S on a Mac, Ctrl+S on Windows saves the workflow. ⌘↩, or Ctrl+Enter, tests the selected step while Build is open in the visual editor.
- The commands a step runs are the system’s own: on Windows a step runs in
PowerShell, on a Mac in the shell.
echo "…",sleep 2andexit 1work on both;cat,ls,printfand&&do not work on Windows. - Workflow text cannot set the engine’s own mail settings —
mail_on,smtp,error_mail,info_mail,mail_on_error. Saving fails if it does; alerts are set up in Kitewell instead.
Kitewell is developed and supplied by Descarty, Inc. (Tokyo).